What it is
A program that calculates the minimum edit distance between two strings. It supports custom operation costs and outputs edit distance matrixes in either plain text or LaTeX.
The setup
Towards the end of Chapter 2, Jurafsky and Martin introduce the reader to the minimum edit distance algorithm. They provide a description of how the algorithm works (including pseudo code) as well as several examples. The end-of-chapter exercises ask the reader to implement the algorithm, and to add an option to output an alignment between two strings.
The process
Challenge #1 - Understanding the algorithm
Perhaps the most challenging part of this project was wrapping my head around the idea of dynamic programming, since it was the first time I had seen this approach. Even after reading the textbook multiple times there was still a lot I didn’t understand.
I decided to look for additional sources. I searched for ‘edit distance’ on YouTube and came across these two videos:
After watching each video a couple times, I felt better equipped to deal with the problem, but to gain a little more confidence, I drew edit distance matrixes by hand:
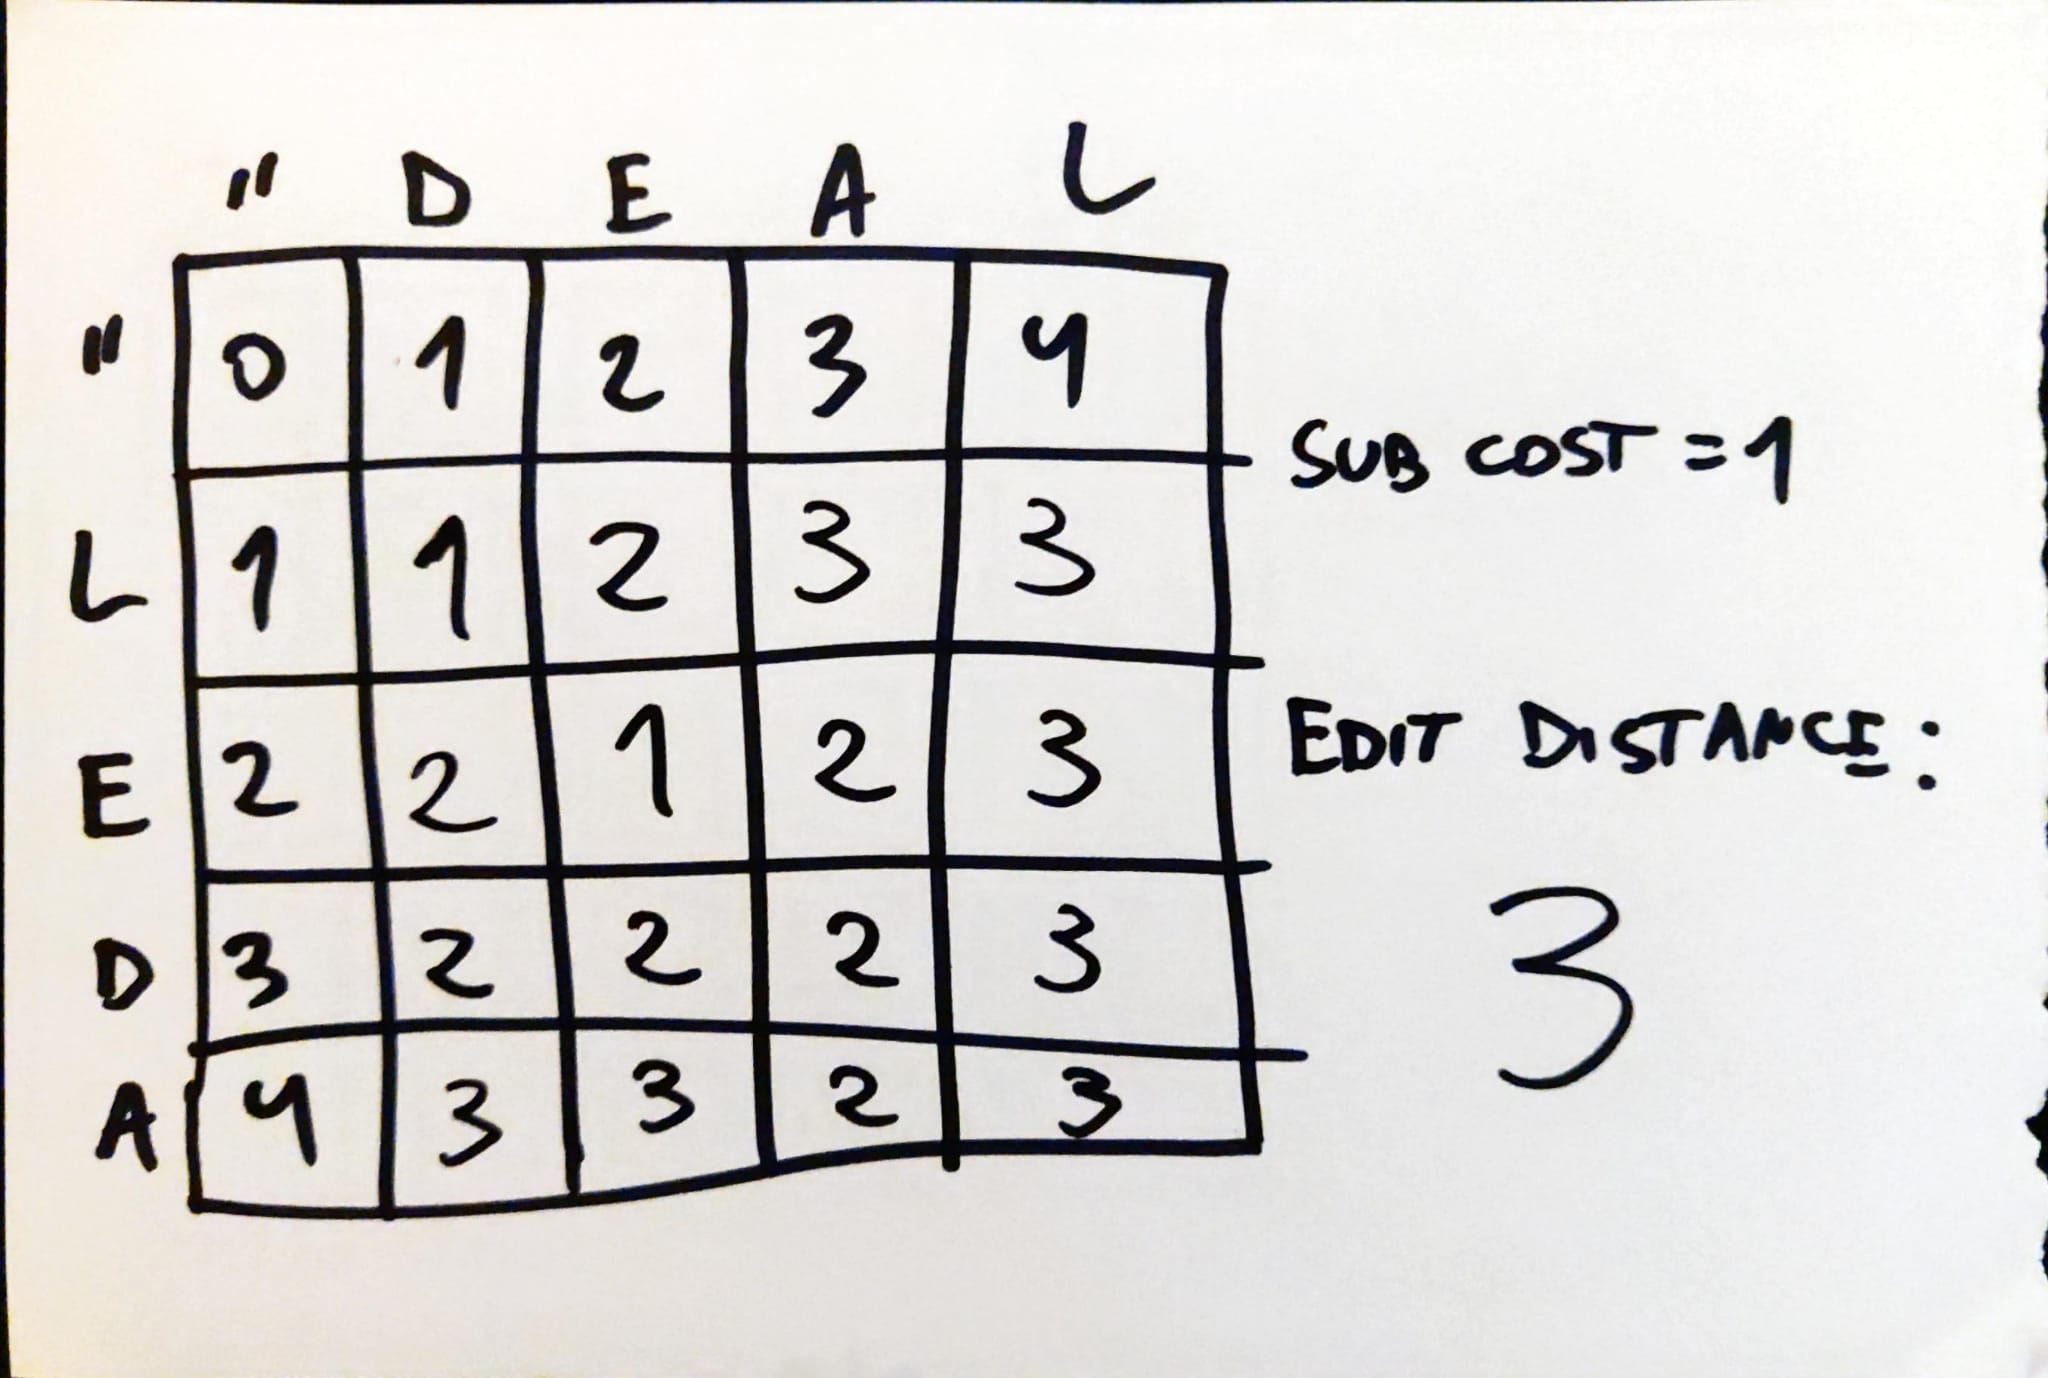
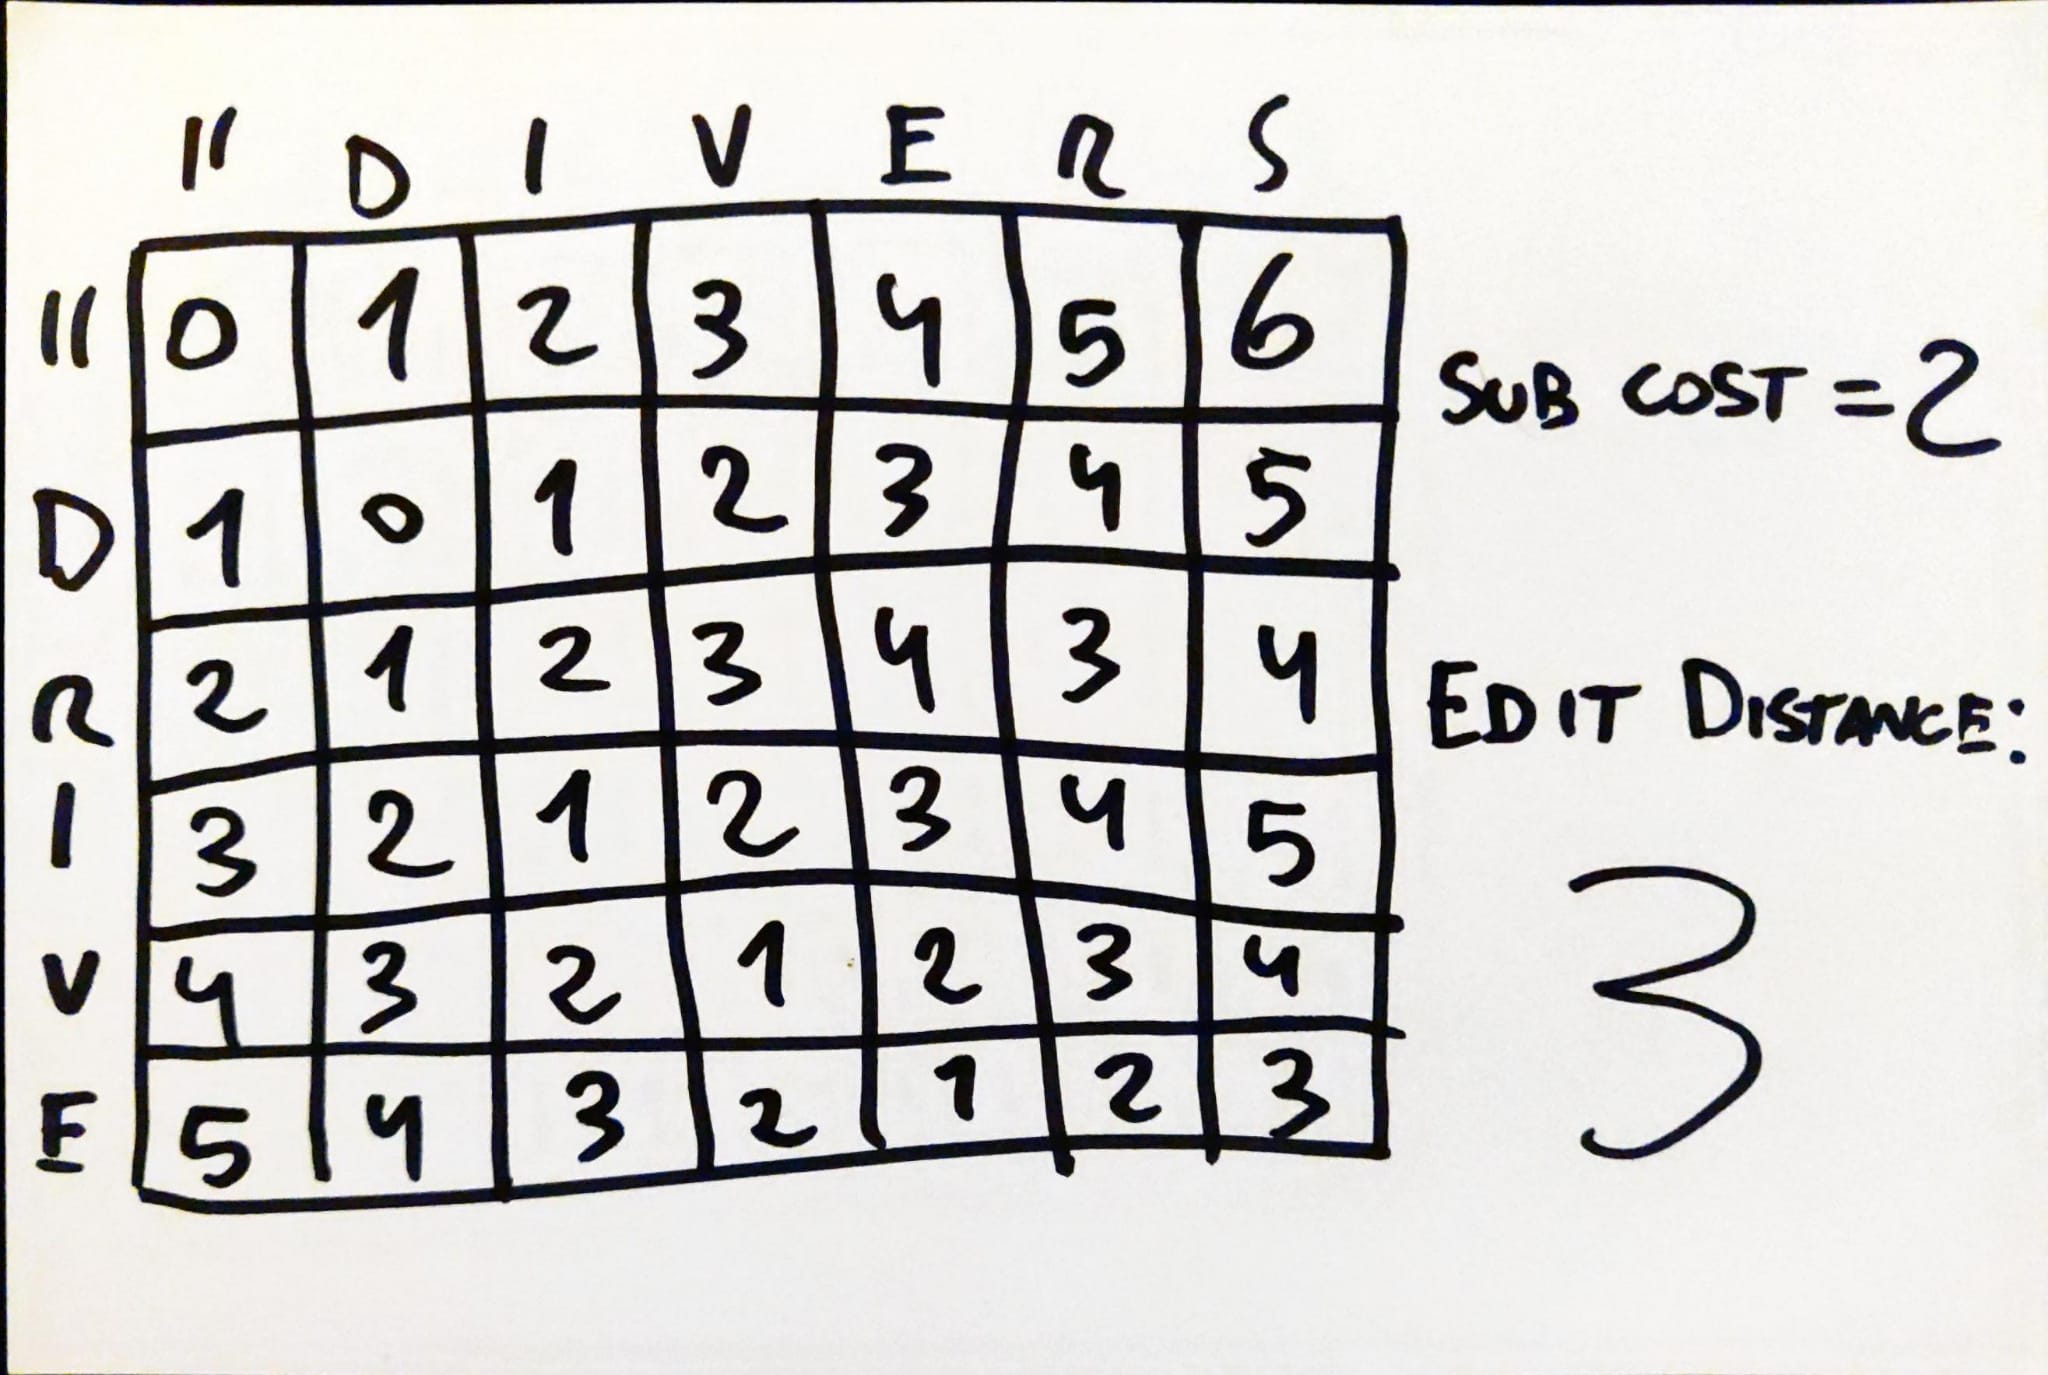
Now, using these edit matrixes (as well as the examples provided by the book), I felt ready to start coding.
Challenge #2 - Implementing the algorithm
For reference, here’s the pseudo code provided by the textbook:
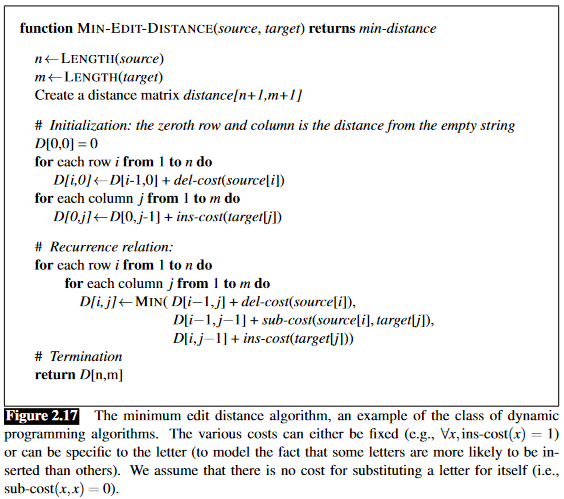 Jurafsky & Martin (2021), p. 24
My first approach was to implement this code as directly as possible, which you can find. This gave me a solid foundation to build upon, which I used to implement the features below:
Storing pointers
First, I needed to modify my matrix to store pointers. These pointers would later be used to output an alignment. To see what that looks like, here’s an example from the textbook:
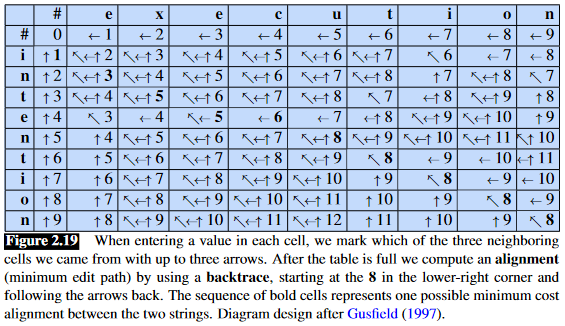 Jurafsky & Martin (2021), p. 25
Since each cell stores not only a number but a series of pointers, I changed the values in my original matrix: instead of a number, each value would be a dictionary consisting of a number and pointers. Here’s an example:
1

{'number': 11, 'pointers': ['up', 'left']}
This would certainly be more confusing if I hadn’t done that first version of the program! Thankfully, I had, so I was able to use most of the existing code with just a few modifications. One modification was to have the function return not just the minimum edit distance cost but the edit distance matrix as well. We need that matrix for the functions below.
Something else that really helped (not only for this step but throughout the whole project) was to use the examples in the textbook to recognize patterns. Thankfully this chapter provided many examples, but this approach would work even if didn’t1.
Generating alignments
For this one, I created another function, align(), which would take source and target strings and generate an edit distance matrix. Then, starting from the last value, the function would backtrace: look at the pointers in that cell and move in the corresponding direction until it arrived at the first cell. If more than one pointer was available, the function would choose between them randomly.
That’s the overall idea, but how to transform the backtrace into a set of strings? The result we want looks like this:
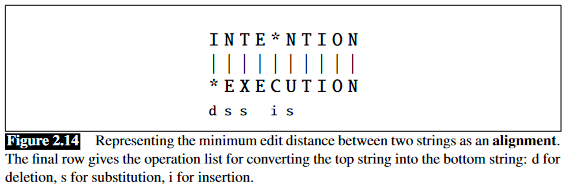 Jurafsky & Martin (2021), p. 22
From looking at the end result I knew the output had to consist of three strings: one for the source (i n t e * n t i o n), one for the target (* e x e c u t i o n), and one for the operations performed d s s i s). My approach was to generate these three strings during the backtrace: with each step towards the first cell, we use the pointer we chose to tell us what operations need to happen, which in turn tells us what we need to write for the source, target, and operation strings:
1
2
3
4
5
6
7
8
9
10
11
12
13
14
15

if direction == 'up':
    source_output = source[i] + source_output
    target_output = '*' + target_output
    operations = 'd' + operations
if direction == 'nw': # Diagonal up & left
    source_output = source[i] + source_output
    target_output = target[j] + target_output
    if source[i] == target[j]:
        operations = ' ' + operations
    else:
        operations = 's' + operations
if direction == 'left':
    source_output = '*' + source_output
    target_output = target[j] + target_output
    operations = 'i' + operations
Implementing pretty printing
Last but not at least, I wanted an option for my program to print “pretty” versions of the edit distance matrixes, akin to the examples provided by the book. I wanted my pretty printer to either output to plain text or LaTeX, and, if outputting to LaTeX, optionally print the pointers as well.
To do this, I once more took to the examples provided by the textbook. Consider this one:
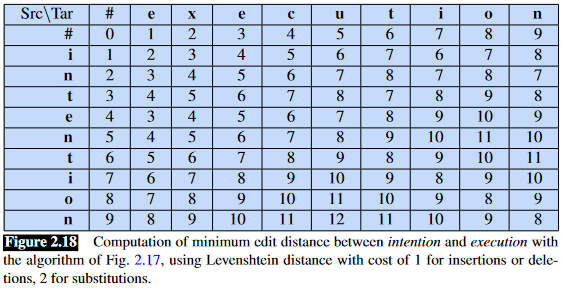 Jurafsky & Martin (2021), p. 24
In this example, the source and target strings are themselves part of the table. I decided to do the same for my pretty printer: I’d take the matrix generated by min_edit_dist() and add to it an extra row (for the target string) and column (for the source string)2.
To make it less daunting, I implemented one feature at a time. The first version outputted only to LaTeX; outputting plain text and pointers was implemented later. Now I could display much prettier versions of the edit distance matrixes I’d done by hand:
\[\begin{array}{|c|c|c|c|c|c|} \hline & '' & d & e & a & l \\ \hline '' & 0 & 1 & 2 & 3 & 4 \\ \hline l & 1 & 1 & 2 & 3 & 3 \\ \hline e & 2 & 2 & 1 & 2 & 3 \\ \hline d & 3 & 2 & 2 & 2 & 3 \\ \hline a & 4 & 3 & 3 & 2 & 3 \\ \hline \end{array}\] \[\begin{array}{|c|c|c|c|c|c|c|c|} \hline & '' & d & i & v & e & r & s \\ \hline '' & 0 & 1 & 2 & 3 & 4 & 5 & 6 \\ \hline d & 1 & 0 & 1 & 2 & 3 & 4 & 5 \\ \hline r & 2 & 1 & 2 & 3 & 4 & 3 & 4 \\ \hline i & 3 & 2 & 1 & 2 & 3 & 4 & 5 \\ \hline v & 4 & 3 & 2 & 1 & 2 & 3 & 4 \\ \hline e & 5 & 4 & 3 & 2 & 1 & 2 & 3 \\ \hline \end{array}\]Which is what happened in Chapter 3: the textbook provides formulas for calculating n-grams but does not provide an algorithm. In this case, I came up with the examples myself (like the tables I used to map out iteration) ↩
Actually, what I did was to initialize an empty matrix, append the first row (the target string), and then append the remaining rows (consisting of a letter from the source string + the value of the current cell in the edit distance matrix). It’s much easier do to this by converting the source and target strings to lists (don’t forget to add an empty character!). Again, the examples greatly helped me figure this out! ↩